
Understanding Managed Identities
How to Create & Use them.

Managed Identities are really cool as they eliminate the need for remembering or storing credentials - keys & secrets.
They make authentication & authorization seamless between any two resources that support Microsoft Entra ID (Azure AD). The authorization side is enforced by the target resource based on the roles that you assign to the managed identity.
For instance, If you are working with Azure Logic Apps that needs to read from a blob storage. You don't need to use the storage account keys to authenticate. You can easily:
✅ Create a managed identity for the Azure Logic App
✅ Assign roles/permissions that are required to perform action on the Blob storage.
✅ Specify the managed identity as the authentication method in your Logic App.
Microsoft handles the rest. Same process applies for Azure Functions, you just need to use the managed identity in the code to authenticate against any resource. The Azure.Identity package provides everything required to implement this.
In this post, we will demonstrate Managed identities using Logic Apps.
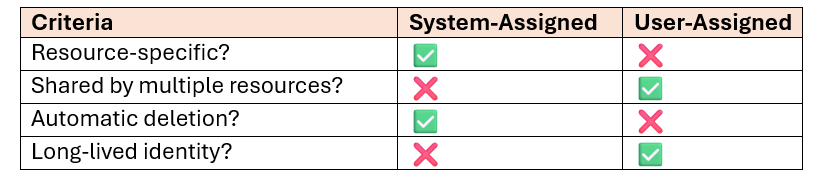
There are two types of managed identity that can be created:
System-Assigned Managed Identity:
Automatically created and tied to an Azure resource (e.g., Azure function, Logic App).
Deleted when the resource is deleted.
User-Assigned Managed Identity:
Created independently and can be assigned to multiple resources.
Exists even if any of the resources it's attached to is deleted.
The choice between System-Assigned and User-Assigned Managed Identity depends on your use case, resource lifecycle, and sharing requirements. This table should help:
Let’s dive into a walkthrough to configure a Managed Identity for a Logic App to read files from Azure Blob Storage.
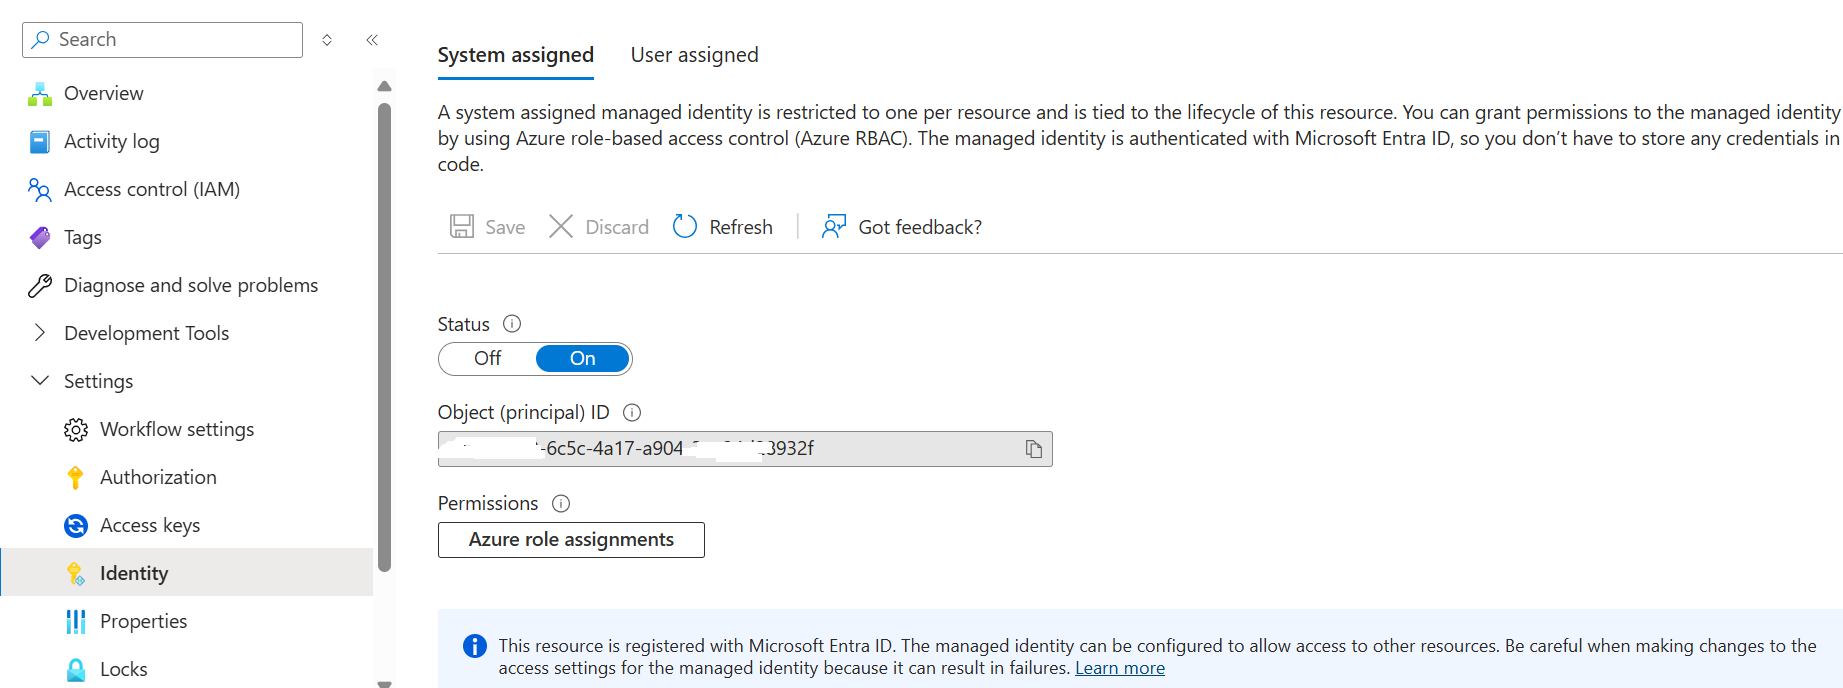
Step 1: Enable Managed Identity for the Logic App
1. Open the Azure Portal and navigate to the Logic App
2. In the left-hand menu, select Identity under the Settings section.
3. Toggle the System-assigned Managed Identity option to On
4. Click Save
Step 2: Grant Blob Storage Access to the Managed Identity
To allow the Logic App to read files from Blob Storage, we must assign the appropriate role to its Managed Identity.
We can do this by clicking on the “Azure role assignments” button as well but to explain clearly we will add the permissions from the target resource itself.
1. Navigate to the Blob Storage account in the Azure Portal.
2. Select Access Control (IAM) from the left-hand menu.
3. Click Add role assignment
4. Choose the following settings:
- Role: Storage Blob Data Reader
- Assign access to: Managed Identity
- Select members: Choose the Managed Identity that we created in the previous step.
5. Click Review & Assign

Step 3: Configure the Logic App to Use Managed Identity
Now, update the Logic App to use the Managed Identity for authentication.
1. Open the Logic App Designer and add the action that interacts with Blob Storage (in this case "Get Blob Content").
2. In the connection settings:
- Set Authentication Type to Logic Apps Managed Identity.
- Set Connection Name to any desired name.
3. Save the Logic App.

Configuring the Get blob content action. I just needed to provide the storage account name. I was able to navigate to the blob I wanted to read from.

If you are unable to browse the storage account, ensure that you yourself also have the role: Storage Blob Data Reader
Step 4: Test
We need to test to ensure it can access the Blob Storage account without errors.
In my case, I had uploaded a text file in the blob container.

Since I am using a recurrence trigger, I just waited for 1 minute to see that my workflow was triggered.
The content of the text file was displayed in the output body of the “Get blob content” action as shown below:

If the Logic App fails, ensure:
- The correct role (Storage Blob Data Reader) is assigned.
By enabling Managed Identity and configuring the appropriate role assignments, you can avoid the hassles and risks of keeping secrets or keys and focus on building robust business workflows & logic.
That’s all for today and see you in the next one!